If you are looking for an answer on how to adjust the projector so that the images fit the screen properly, then you are at the right place.
For presentation audiences and movie watchers, the worst thing to have is an irregular oblong projection which results from an off-center placed projector.
This comes when, there are people and objects in between the projector and the screen and for this reason, it is not always possible to have a straight set up.
Since we can’t always get a perfect fit as we may have limits on how the projectors are placed (due to space constraints) and since it is also physically impossible to place the projector on the ceiling and have the projection dead center.
We need a may to move the image without having to move the projector up and down or sideways.
But you may also notice how auditoriums and theaters have their projectors mounted on the ceiling, how is that possible? Since projectors are supposed to project in a straight line.
Well…
There are built in features in projectors that help curb this problem, without having to place the projector center and have center perfect pictures.
Which is what this piece of article is about.
Also check out our article on Keystone correction
How do I adjust projector to fit screen.
There are three ways to do go about with this, below are some ways to do that.
Physically moving the projector.
Simple yet hard to do, to adjust a projector simply move the projector forward, backward and side-ways so that it squares off properly.
It is best having it placed in the right position, without having to alter the projection.
But…
As said from above that, it is not ways possible and so another method will be needed, since the audiences and objects, will be blocking the whole set up.
This set up, is only possible if the set up is on a table in front of the screen with the audience behind the set up.
Obviously, this cannot be done, as it is why, this article is being read in the first place.
Keystone correction
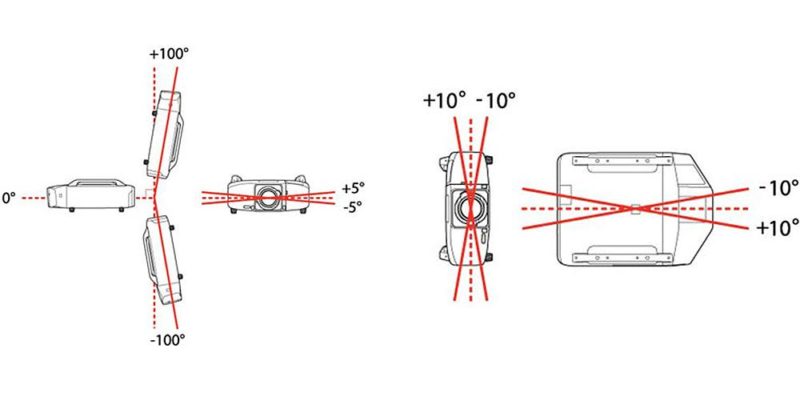
The keystone effect happens when the projector not placed perpendicular to the screen, resulting in a trapezoid kind of image or misalignment of the image.
Keystone has two types, manual keystone correction and digital keystone correction. The manual one, involves parts physically moving, so that the lens move ±30 and ±50 for some projectors.
A scroll wheel on the front of the projector moves the lens which users scroll accordingly, to fit the image projector on the screen.
Digital keystone correction, involves digitally altering the image using methods of compression and
A ship adds water to the opposite side to balance the load and avoid leaning to one side.
Digital keystone correction happens automatically and requires no effort on the users.
How to adjust projector to fit screen using keystone correction
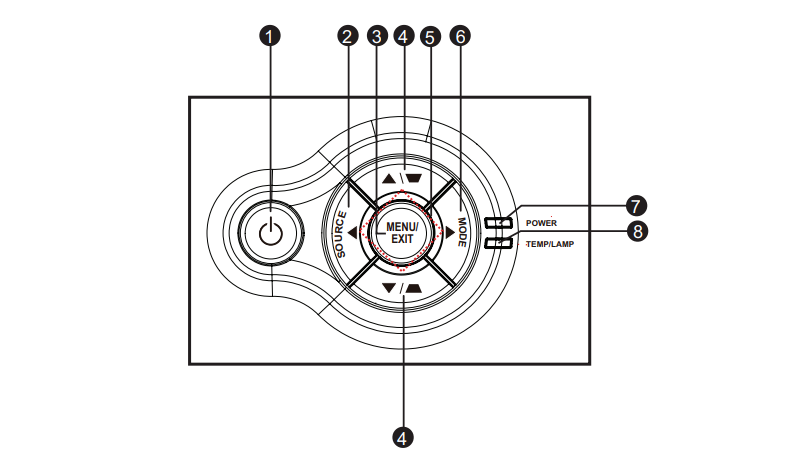
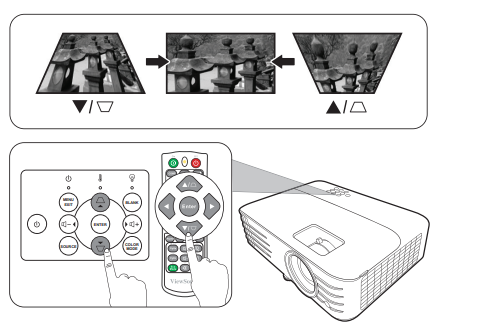
The image above, is that of a ViewSonic projector, to use the keystone correction feature, press the +/- button which is denoted as the number 4 on the image above.
Keystone buttons are above and below.
Keystone correction, are available on most projectors, on most projectors, the keystone + and – buttons will be on the remote or on the top of the device itself.
Press the + and – to fit the image to your liking.
Check the manual for more info.
Lens shifting
Lens shifting is similar to keystone correction, but the major difference, is that lens shifting is more flexible.
It is flexible, in terms of the lens movement, it has the ability to move up, down left right, in order to find the perfect angle in which an image is to be projected.
Shifting the lens from the controls provided with the projector is a way, that you can adjust an image.
Adjusting projector to fit screen using lens shifting

The image above, shows ViewSonic projectors menu, from which the lens shift settings can be set.
To control the lens shift, use the remote, with the button menu
Now on a final note for lens shifting, a fact about lens shifting, is that, it requires many lenses and since the lenses are costly, it tends to bring up the price of the projector.
So with that said and also brings this to the point, which is that, lens shifting capability, are only present in the more pricier high end projectors.
Conclusion
So to conclude this short piece, there are three ways to correct an image that is oddly shaped from imperfect installation of the projector.
Physically moving the projector, using keystone correction and using lens shift, the focus of this article is on keystone correction and lens shifting.
Both of these method are built into nearly all projectors, but lens shift is only for the high end projectors.
Some may need physical adjustment, while others are digitally (automatically) done.
So if you need to adjust projector to fit screen, you will adjust the image using either keystone correction or lens shifting.
